Support Topics
- General Questions
- Pricing & Payments
- Preparing Your Artwork
Can't find your anwser? Contact Us
You first need to have a digital file of your artwork. This means that you have a copy of your artwork on your computer or mobile device.
Once you have this, then you can upload this file through our ADD IMAGES page of our control panel. You can also go to your MANAGE PORTFOLIO section and upload a high-resolution image for an existing image that is already on our site.
If you don't have a digital copy of your image, you will need to scan the artwork into a digital file using a flatbed scanner. You can get a decent scanner for around $100 if you don't have one, or you can take your artwork to a service provider to scan it in for you.
You can also take a picture of your artwork using a digital camera. The quality is not as good as a scanner, but sometimes it's your only option - especially with large artwork. Make sure you have a high megapixel camera for the best results. The more megapixels the camera has, the more detail you will capture and the larger print sizes you can offer.
Uploading images for the print program is done just like your normally upload artwork for our site. The only change is that once you are a print program member, you have a new option on the upload forms asking if you want sell prints of the artwork.
If you are uploading a new image that is not currently on your portfolio, simply upload your high-resolution image for the print program like normal. Make sure the box is checked to sell prints on the form, then select which sizes you want to offer, once you have uploaded your image.
If you want to add print options to an existing image on your portfolio, go to your MANAGE PORTFOLIO page and click on the EDIT button on the image you want to update. At the bottom of this form, there is a link for you to upload your high-resolution image for the print program. Once you do this, print sizes will be offered to you.
NOTE: Updating a high-resolution image from your portfolio, will not change anything on your portfolio. This process simply saves a high-resolution image if prints are ordered on that artwork.
We do not store a high-resolution version of your artwork as a free/basic member. High-resolution files are required to create and sell prints of your artwork. Without this, the low-resolution images would come out very blurry or pixelated if we were to try using your existing images.
To upgrade the quality of your images, you need to re-upload a high-resolution image for the print program. You can do this by going to the MANAGE PORTFOLIO section in your control panel, clicking on the EDIT IMAGE button, then click on the link to upload a replacement image.
After our staff has reviewed the before & after image, it will be approved for replacement and the new print options will appear (normally 1-2 days after upload).
By doing this, you will not lose any hits/comments associated with your images, because you are simply adding a high-res image to artwork already on your portfolio.
We recommend that your files be around 300-400 dpi (dots per inch). You can go higher or lower, but your prints will turn out better at higher resolutions. The more pixels your image has, the larger the prints you can offer so upload the highest quality images you have.
Each print size has a minimum resolution that we can accept. Prints under 8x10 must be at least 200 dpi. Prints over 8x10 can go as low as 150 dpi. You can find a list of the minimum DPI on our product chart (link).
For example, an 8x10 image at 200 DPI would have a resolution of 1600 x 2000 pixels. An 8x10 image at 300 DPI would have a resolution of 2400 x 3000 pixels. An 8x10 image at 400 DPI would have a resolution of 3200 x 4000 pixels.
If this is all too confusing for you, don't worry. Simply upload your artwork and our website will determine your DPI and what print sizes you can offer.
Here is a link to our pricing table, which also shows the minimum resolution for each print size.
There are many ways to do this, depending on your operating system and the software you have. Almost any image editing program (ie PhotoShop) has a function to tell you the resolution of your images.
Within Photoshop, simply open up your image and go to IMAGE...IMAGE SIZE and the dialog box will tell you the resolution/pixels as well as the DPI.
Within Windows, you can simply view the folder that contains your images and change the view type to DETAILS and it should tell you the resolution of your files in one of the information columns.
If you are unable to determine the resolution of your images, ArtWanted.com will tell you the resolution when your files are uploaded. We will also calculate automatically which print sizes you can offer from the file you have uploaded.
This depends on how large of print you want to sell on our site. If you have an 8x10 piece of artwork and you want to sell 8x10 prints, you can scan this image at 200% or the minimum 200 DPI. However, if you want to sell prints larger than 8x10, you will have to increase the DPI of your scan. When in doubt, scan high so that you can offer more sizes of prints.
Please consult your scanner's manual and help files on the exact steps to change the DPI of your scanning preferences.
NOTE: Remember to clean your glass of your scanner and make sure it's free of any dust particles. A small hair or dust particle on your scanner can be real obvious once you blow up the image to larger sizes.
We recommend that you upload a high-quality JPG image in RGB format.
NOTE: Images in CMYK mode must be converted to RGB mode before you upload them to ArtWanted. If you don't know what CMYK is, then you probably don't need to worry about it, because most things are in RGB mode by default.
No. Simply upload the highest resolution image you have and we will take it from there. If you resize your image downwards, then you will not be able to offer larger print sizes and you will lose detail. If you try and resize your image larger, you will lose quality and only make your file sizes bigger.
NOTE: Do not try to increase the resolution of your images to offer larger print sizes or get more DPI. It doesn't work that way. You can't take a small digital file and resize it to a higher resolution file and think that you will not lose quality. The file will only lose quality and be blurry at the larger sizes.
Every image that is posted to our site has a different aspect ratio. This means that some are taller, some are wider, others are square. This is also true with the sizes of prints we offer. No image will fit all sizes exactly, because each paper size has a different aspect ratio. Your image may fit perfectly on an 8x10 print, but it won't on a 5x7 print.
When you upload artwork to our site, you are given a list of sizes that can be offered and we also indicate which ones are best for the image you have uploaded. Usually, if you just go with the default sizes we suggest, you will be fine.
To compensate for the variety of sizes, we trim any artwork that is not an exact fit to the paper size that was ordered. This trimming is usually a very small percentage of the image, but it allows you to offer more sizes of prints of your artwork.
For example, if you upload an image that is 5x8" and you want to sell a 5x7" print, we will trim 1/2 inch off the top and bottom so that the artwork fits within the 5x7 size.
We do not leave any white space on the prints. We zoom up the image to fill the entire print area because it looks the best this way. We offer square prints all the way up to prints that twice and long as they are tall.
Buyers have the option to choose the final print size and can adjust the cropping of the image to best fit your artwork.
NOTE: If your image has a border around it that is part of the artwork, we suggest only offering the exact sizes that will not be trimmed. Otherwise, two of the sides of the border will be cropped or removed entirely. See the examples on the next question.
Each paper size in our print program has a different aspect ratio, so does the artwork you upload. Because of this, it's necessary for us to trim a small portion of the image to get it to fit on your desired size print. When you upload your artwork to our site, we tell you which sizes will be the best fit for your artwork and which sizes should be avoided.
The image trimming is normally not a big issue, unless your image has a border on the artwork. If you have a border, you need to be really careful to match the aspect ratio of the artwork to the print size you want to offer. If you don't, the border will be cut off on the sides or top/bottom as the images below illustrate. Notice that different size prints, effect what areas of the image are trimmed/cropped.
The following images illustrate the trimming results from various paper sizes from the same artwork. The white 'faded out' area would be cut off the image to fit on the paper size.
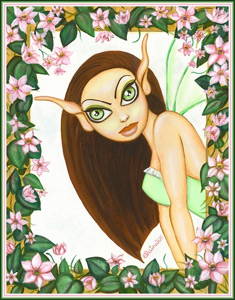 Original
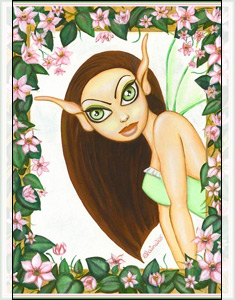 3.5 x5 Print
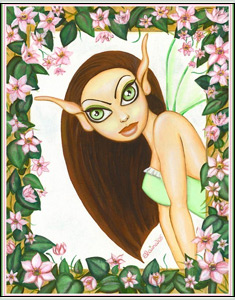 4 x 5 Print
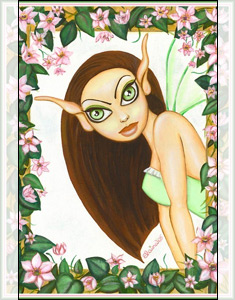 4 x 6 Print
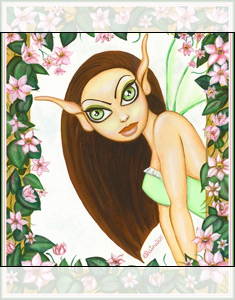 5 x 5 Print
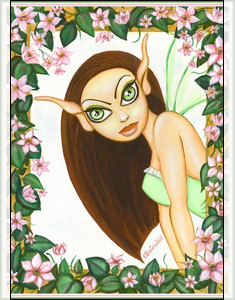 5 x 7 Print
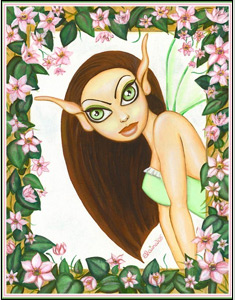 8.5 x 11 Print
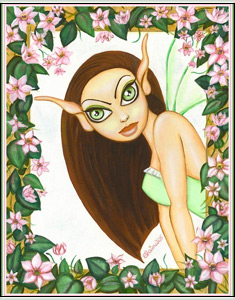 8 x 10 Print
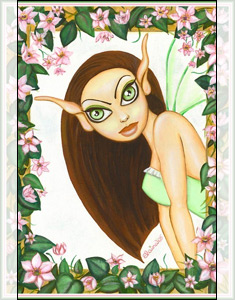 8 x 12 Print
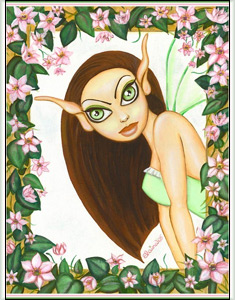 9 x 12 Print
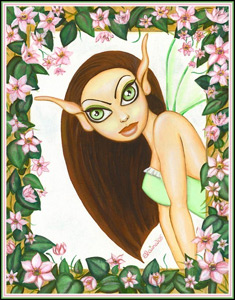 11 x 14 Print
 Original
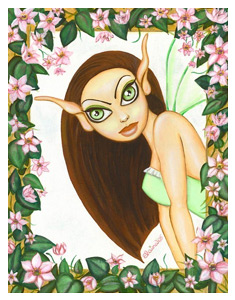 Cropped Print
The best solution for this image would be to crop out the thin borders, before you upload the artwork to our site (as shown in the Cropped Print image). This only needs to be done on the high-resolution image for the print program, but this will allow the artwork to look great in many different print sizes. The next best solution for this image would be to only offer a few sizes that produce no image trimming (ie 8.5x11 and 11x14).
At this time we do not accept mailed artwork to upload on your behalf.
We prefer that you upload your artwork through our website for real-time feedback on your resolution & print sizes you want to offer.